How to Fix a ZPL Barcode That Will Not Scan
A ZPL barcode can look correct in a preview and still fail on a scanner. The usual reason is that barcode readability is a physical result, not just a visual one. Module width, quiet zones, darkness, speed, media, DPI, and scanner configuration all meet on the final printed label.
This guide gives you a practical order of operations. Start in the browser with ZPL Viewer and Barcode Generator, then validate with one real Zebra printer and the scanner that operators actually use.
1. Confirm the barcode command matches the data
Do not debug print darkness before confirming the symbology. A carrier tracking number, a GS1-128 healthcare value, and a compact product URL should not all use the same command shape.
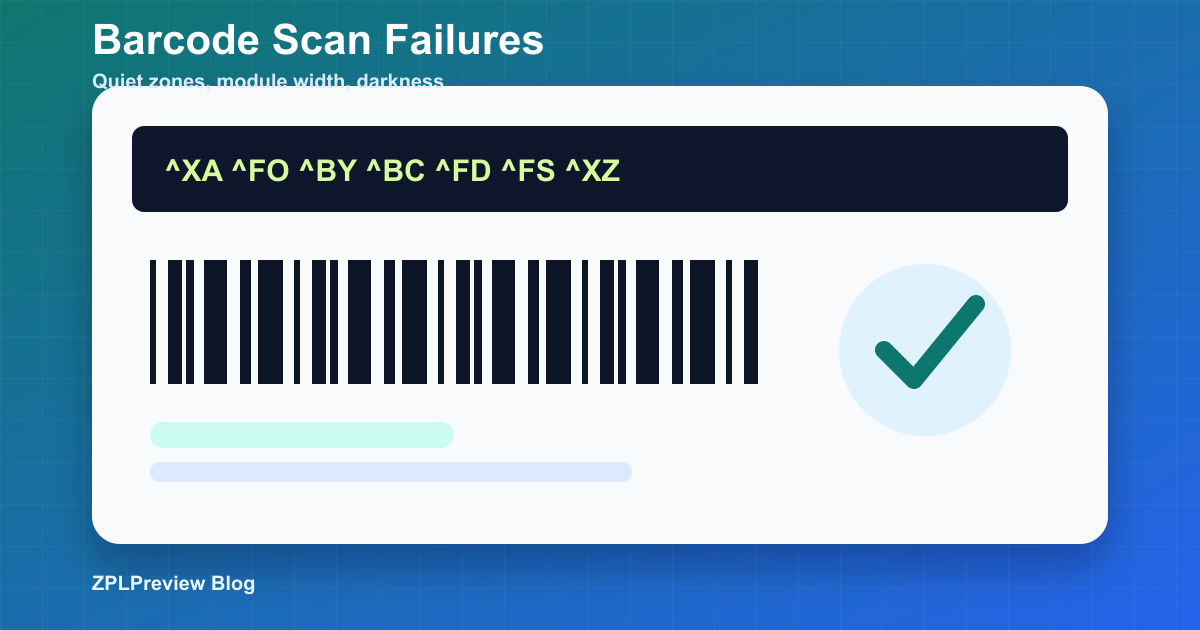
^FO60,80
^BY3
^BCN,120,Y,N,N
^FD1Z999AA10123456784^FS
The example above is a straightforward Code 128 block using ^BC. If you need application identifiers such as (01), (17), (10), or (21), use the GS1 / Code 128 ZPL Helper as a starting point and test with a scanner configured for GS1 parsing.
2. Make the module width readable
The ^BY command controls the default module width for many one-dimensional barcodes. A value that worked on a 203 DPI printer may become too dense after a template is moved to 300 DPI without review.
^BY2  ; narrow, compact, easier to break
^BY3  ; common starting point for shipping labels
^BY4  ; wider, more readable, uses more label space
If operators say the scanner “sometimes” reads the code, increase module width before changing every coordinate. Then preview the label again to ensure the wider barcode still fits inside ^PW and ^LL.
3. Protect the quiet zone
Barcodes need blank space around the symbol. A vertical line, box, logo, or text field placed too close can create a scan failure even when the bars themselves are perfect. In ZPL this often happens when a field is moved with ^FO and the old surrounding elements are not moved with it.
Make a minimal barcode label
When a production label contains logos, address blocks, boxes, and several barcodes, it is hard to know whether the scanner dislikes the barcode data or the surrounding layout. Create a tiny reproducer that contains only the barcode command, the same data, and the same density assumption.
^XA
^CI28
^PW812
^LL320
^FO60,60^BY3,3,120
^BCN,120,Y,N,N
^FD1Z999AA10123456784^FS
^XZ
If this minimal label scans but the production label fails, the root cause is probably quiet zone, clipping, scaling, rotation, or nearby artwork. If the minimal label also fails, focus on data format, symbology, module width, print settings, media, or scanner configuration.
The ZPL Minimal Reproducer can help cut a large template down to the few commands needed for a bug report. That is often faster than sending a 400-line ERP export to a printer vendor and asking them to guess.
4. Check darkness and speed after layout
Once the command and layout are sane, move to printer settings. Darkness can make bars bleed together; speed can reduce edge quality. Zebra commands such as ~SD and ^PR are powerful, but they affect real hardware, so treat them as production settings rather than decorative ZPL.
~SD15
^PR4
Use Zebra Printer Settings to generate controlled setup snippets. Keep a record of the previous setting so the team can roll back if the change helps one label but hurts another.
5. Verify DPI conversions
A barcode that was copied from a 203 DPI template into a 300 DPI template may be physically smaller than expected. Use the ZPL Label Size Calculator for label dimensions and the ZPL DPI Converter when you need to scale coordinates, barcode height, and font sizes together.
Check the data, not only the drawing
Some scan failures are data failures disguised as print failures. GS1 labels are the classic case. The human-readable text may show parentheses like (01) and (17), but the encoded data should use the scanner's expected application identifier format and separators. A scanner may read the bars but reject or mis-route the value downstream.
Human-readable:
(01)09501101530003(17)260630(10)LOT42

Encoded GS1-128 concept:
01 09501101530003 17 260630 10 LOT42
For GS1 work, parse the value with GS1 Data Parser and generate a controlled example with GS1 / Code 128 ZPL Helper. That keeps business data validation separate from layout tuning.
Read failures by symptom
- Scanner reads only at very close range: barcode may be too small, too dense, or printed with weak contrast.
- Scanner reads some labels in a batch: check darkness, speed, ribbon, media coating, and printhead cleanliness.
- Preview looks fine but print is clipped: inspect
^PW,^LL, field origins, and physical media size. - Scanner beeps but software rejects the value: validate symbology, GS1 separators, check digits, and scanner prefix/suffix settings.
- Only migrated labels fail: compare original and converted ZPL with ZPL Diff, especially
^BY, rotation, and DPI scaling.
Production checklist
- Preview the whole label, not just the barcode block.
- Test the printed label with the real scanner, at the operator's normal distance and angle.
- Keep human-readable text below the barcode for manual fallback.
- Record the printer model, DPI, media type, darkness, and speed used for approval.
- When changing a barcode, use ZPL Diff to review the exact command differences before release.
If the barcode still does not scan, create a tiny test label containing only the barcode. If the tiny label scans, the issue is layout. If it does not, the issue is data, barcode command, printer settings, media, or scanner configuration.
Barcode debugging is rarely one magic fix. The reliable workflow is boring in the best way: isolate the barcode, prove the data, preview the full label, tune the physical print, and record the approved settings so the next template change starts from a known-good baseline.